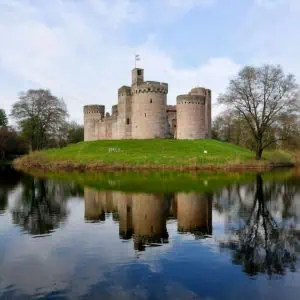
Medieval castles were built with defense in mind, and one of their most vital features was the castle wall, also known as the curtain wall. These massive structures protected the inhabitants from sieges and attackers, and their design included many strategic architectural elements. Here’s a breakdown of the main parts of a medieval castle wall, highlighting their purpose and importance.

1. Curtain Wall
The curtain wall was the primary defensive wall that encircled the castle’s inner areas, such as the bailey (courtyard). These walls were typically made of stone and constructed to be thick and tall—often several meters in height—to resist battering and scaling attempts.
2. Wall Walk (Allure)
On top of the curtain wall was the wall walk, also known as an allure. This was a narrow passage along the top of the wall, allowing guards to patrol the perimeter and quickly move to threatened sections during an attack. It also served as a firing platform during battles.

3. Parapet
Along the edge of the wall walk was the parapet, a low protective wall that shielded soldiers from enemy projectiles. The parapet was an essential component for defense and was typically constructed with crenellations for added protection and tactical advantage.

4. Crenellations (Battlements)
The parapet was designed with crenellations—a pattern of alternating high and low sections:
- Merlons: The solid upright parts that provided cover.
- Crenels (or embrasures): The open gaps through which archers or crossbowmen could shoot.
Together, these formed the battlements, a defining feature of any fortified medieval wall.

5. Machicolations
Machicolations were stone platforms that projected outward from the top of the wall or tower, with openings in the floor. These allowed defenders to drop stones, boiling water, or hot oil directly onto attackers at the base of the wall, making it difficult for enemies to approach or scale the wall.

6. Hoardings
Before stone machicolations became common, castles sometimes used hoardings—temporary wooden structures built out from the wall. These overhanging platforms were used during sieges to attack enemies from above, offering similar functionality to machicolations, but were more vulnerable to fire.
7. Arrow Slits (Loops)
Strategically placed throughout the walls were arrow slits, also known as arrow loops or embrasures. These were narrow vertical openings that allowed archers to shoot while remaining mostly protected. The design often widened inward, giving defenders a wider field of fire.

8. Flanking Towers or Wall Towers
To strengthen the wall’s defense, towers were constructed at intervals along the curtain wall. These flanking towers gave defenders a higher vantage point and allowed for crossfire along the wall’s length. Towers could be round or square, and were often used as lookouts, armories, or garrisons.
9. Postern Gate
The postern gate was a small, concealed doorway in the wall, typically located away from the main gate. It served several purposes:
- As a secret escape route.
- For launching surprise counterattacks during a siege.
- For discreet movement of messengers or supplies.
Though small, it was heavily guarded and often hidden from view.
10. Scarp and Ditch (or Moat)
At the base of the wall, many castles featured a scarp—a steep outer slope that made climbing difficult. In front of this might be a ditch or a moat (sometimes filled with water), designed to slow down attackers and prevent siege engines from reaching the wall. These obstacles were often the first line of defense.

🛡️ Conclusion
The design of a medieval castle wall was a masterpiece of military engineering, combining physical strength, defensive features, and tactical elements to withstand prolonged sieges. From towering curtain walls to hidden postern gates and lethal machicolations, every part had a purpose in the survival of the castle and its defenders.
What is a curtain wall in a medieval castle and why was it important?
The curtain wall was the large outer stone wall that surrounded the main parts of a medieval castle. It acted as the first line of defense against attackers, connecting defensive towers and enclosing courtyards and living quarters. Its height and thickness made it difficult to scale or destroy during sieges.
How did the drawbridge function as part of a castle’s defense?
The drawbridge served as both a point of entry and a defensive feature. It was typically positioned over a moat and could be raised or lowered using chains or pulleys. When raised, it blocked access to the main gate, making it difficult for invaders to breach the castle entrance.
What were battlements and how did they help castle defenders?
Battlements were the notched parapets that ran along the tops of castle walls. They consisted of alternating high sections (merlons) and gaps (crenels) that allowed defenders to fire arrows, throw stones, or pour boiling liquids on attackers while staying protected behind the solid parts.
What is a portcullis and what role did it play in protecting the castle?
The portcullis was a heavy, iron-reinforced wooden gate that slid vertically within grooves in the gatehouse. It could be dropped quickly in emergencies to block the entrance. Often used in combination with a drawbridge and doors, it added an extra layer of protection at the main gate.
Why were towers an essential part of medieval castle walls?
Castle towers provided elevated positions for soldiers to monitor the surroundings and defend the walls from above. Placed at intervals along the curtain wall and often at corners, they allowed for better range of vision and the ability to fire in multiple directions during attacks or sieges.
What were arrow slits and how were they used during battles?
Arrow slits, also called loopholes, were narrow vertical openings in the castle walls that allowed archers to shoot at attackers from inside. Their small size made them difficult to shoot through from the outside, giving defenders a significant advantage during sieges.