Medieval Castle Defensive Parts (Overview)
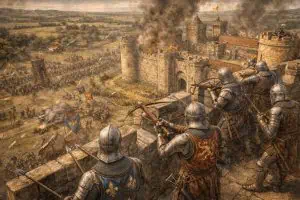
Medieval castles were built not just for grandeur, but for survival. This guide explores the most important defensive parts of a medieval castle, from deep moats and thick stone walls to fortified gatehouses and towering castle keeps. You’ll learn how features like arrow slits, machicolations, and deadly murder holes gave defenders a major advantage during a castle siege. Each part worked as part of a wider defensive system, designed to slow, trap, and destroy attackers before they could break through the walls.
 1")
Part of the Medieval Castle Parts Guide
This article explores the most effective defensive features of medieval castles. For a full breakdown of all castle components — including towers, walls, drawbridges, moats, and dungeons — view the complete Medieval Castle Parts Guide .
Castle Walls
One of the most important castle defenses was the curtain wall—the thick outer wall that surrounded the castle and protected everything inside. Medieval castle walls were built to resist siege weapons, prevent attackers from climbing easily, and give defenders a safe position to fight from above.
Most walls included battlements (also called crenellations) so archers could fire while staying protected. Many castles also added towers along the wall to strengthen weak points and allow defenders to shoot enemies from multiple angles.
 2")
Castle Gatehouse
The gatehouse was the most vulnerable part of a castle, which is why it became one of the most heavily defended areas. A well-designed castle gatehouse could stop an attack even if the enemy reached the entrance.
Gatehouses often included:
- A heavy wooden gate reinforced with iron
- One or more portcullises (a dropping spiked gate)
- Murder holes in the ceiling of the passageway
- Guard rooms and narrow corridors designed as an entrance trap
The goal was simple: force attackers into a tight space where defenders could attack from above and from the sides.
 3")
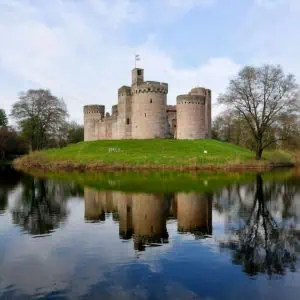
Castle Moat
A castle moat was a wide defensive ditch that surrounded the walls. Some moats were filled with water (wet moats), but many were simply deep dry ditches (dry moats) that were just as dangerous.
Moats helped castles by:
- Preventing attackers from reaching the walls easily
- Stopping siege towers and ladders from being used effectively
- Making mining and tunneling harder
- Slowing down troops during a siege
A moat turned the castle into a fortress that was difficult to approach without being exposed to missile fire.
 4")
Castle Keep
The castle keep was the strongest structure inside the castle and often served as the last line of defense. If the outer walls were breached, defenders could retreat to the keep and continue fighting.
Keeps were designed to be extremely difficult to storm, with:
- Thick stone walls
- Very few windows
- Strong doors and narrow entrances
- Upper levels used for defense and storage
The keep also symbolized the lord’s power, making it both a military stronghold and a political statement.
 5")
Castle Drawbridge
A drawbridge was a movable bridge that connected the outside world to the castle’s entrance, usually spanning a moat or defensive ditch. It allowed access when lowered and could be raised quickly to block enemy entry.
Many drawbridges were operated using a windlass system with ropes or chains, and later designs included counterweights to lift heavy bridges more efficiently.
A raised drawbridge removed the easiest route to the gatehouse and forced attackers into slower, more dangerous approaches.
 6")
Murder Holes
Murder holes were openings in the ceiling of a gate passageway. They allowed defenders to attack enemies trapped below—especially during assaults on the castle gate.
Defenders could drop:
- Stones
- Heavy objects
- Missiles
- Hot liquids (more often water or heated substances, not always “boiling oil”)
Murder holes were most effective when combined with a portcullis and multiple doors, trapping attackers in a deadly enclosed space.
 7")
Barbican
A barbican was a fortified outer gateway built in front of the main gatehouse. It forced attackers to fight through an additional defended structure before they could even reach the castle entrance.
Barbicans were designed to:
- Slow attackers
- Break up enemy formations
- Create a controlled kill-zone
- Protect the gatehouse from direct siege attacks
Not every castle had one, but when present, it added a major layer of defense.
 8")
How Thick Were Castle Walls?
Medieval castle walls varied depending on the castle’s importance, age, and location, but they were often 2 to 4 metres thick (around 6 to 13 feet). Some key areas—especially gatehouses and corner towers—could be even thicker.
Thick walls mattered because they:
- Absorbed impacts from catapults and trebuchets
- Resisted fire and collapse
- Made it harder to tunnel underneath
- Provided safer fighting positions for defenders
Some castles also used multiple layers of walls or reinforced cores to increase strength.
Castle Defensive Parts Historical Timeline
A quick, reader-friendly guide to when major castle defenses became common in medieval Europe. Dates are approximate and varied by region, wealth, and military pressure.
Towers and early keeps
Defensive towers and early keeps provided height, visibility, and strongpoints for holding key positions.
- Improved surveillance and signalling
- Allowed defenders to fire from elevated positions
From wood to stone walls
Stone curtain walls expanded across Europe, improving fire resistance and durability against siege pressure.
- Thicker masonry reduced breaching
- Wall-walks and parapets improved defense
Gatehouses become heavily fortified
The gateway was the most vulnerable point, so gatehouses developed into layered defensive structures.
- Multiple doors and defended passages
- Guard rooms and upper firing positions
Moats and defensive ditches
Many castles used dry ditches; some used wet moats where water and terrain made it practical.
- Slowed siege towers and ladders
- Made mining and approach more difficult
Arrow slits and loopholes
Narrow openings protected defenders while allowing archery and crossbow fire with controlled angles.
- Vertical loops for varied shot angles
- Designs evolved with changing weapons
Portcullis, murder holes, and choke points
Defensive features in gate passages created controlled spaces where attackers were exposed from above.
- Rapidly closed the entrance in an attack
- Supported layered gatehouse defense
Machicolations and reinforced wall-tops
Wall-top structures enabled defenders to target the base of walls and entrances more effectively.
- Openings for dropping missiles downward
- Strengthened parapets and firing positions
Barbicans and outer gateworks
Outer gateways forced enemies to fight through an additional defended approach before reaching the main gate.
- Created extra choke points
- Improved control of the entrance route
Concentric castles (walls within walls)
Multiple defensive rings made assaults far harder, with inner walls positioned to support the outer defenses.
- Attackers faced repeated defensive layers
- Improved internal movement for defenders
Cannons change siege warfare
Gunpowder artillery gradually reduced the dominance of high medieval walls and pushed fortification design toward lower, thicker forms.
- Greater risk of wall-breaching
- Leads into early modern fort design
Castle defenses evolved in layers: first walls and towers, then stronger gatehouses and controlled entrances, followed by increasingly specialized features like barbicans, machicolations, and (in some regions) concentric walls. By the late Middle Ages, cannons began to reshape what “best defense” meant.
 9")
What Were the Most Important Defensive Parts of a Castle?
Castles relied on layered defenses. The “most important” parts were the features that slowed attackers, protected the main entrance, and gave defenders safe firing positions.
Walls and Towers
Thick curtain walls and strong towers formed the primary obstacle and created overlapping fields of fire.
- Height advantage for archers and crossbowmen
- Towers enabled flanking fire along the wall face
- Hard to breach without time, engines, or betrayal
Gatehouse (with portcullis and defended passage)
The gate was the most vulnerable point, so the gatehouse became the most heavily defended structure.
- Multiple doors, portcullises, and narrow passages
- Upper firing positions and controlled access
- Designed to trap attackers in a confined space
Moat or defensive ditch
Whether wet or dry, moats and ditches slowed approaches and made siege equipment harder to deploy.
- Disrupts ladders, rams, and siege towers
- Limits where attackers can concentrate force
- Works best alongside a controlled entrance
Keep
The keep acted as a stronghold within the stronghold—often the final defensive position if outer works fell.
- Thick walls and limited entry points
- Secure storage for valuables and provisions
- Command and refuge during prolonged threats
Defensive fighting positions
Features that let defenders attack while protected: battlements, arrow loops, and specialized openings above key points.
- Battlements (crenellations) for cover
- Arrow slits / loopholes for ranged fire
- Machicolations and murder holes around entrances
Barbican and outer gateworks
Where used, a barbican forced attackers through another defended choke point before reaching the main gatehouse.
- Slows momentum and channels attackers
- Adds time—often the key factor in siege defense
Successful defense depended on making an assault slow, exposed, and exhausting. Castles achieved this by combining barriers (walls/moats), choke points (gatehouses), and protected firing positions (towers, battlements, loopholes).
Quick “siege logic” checklist
- Stop the approach (ditch/moat + clear lines of fire)
- Control the entrance (gatehouse + portcullis + narrow passage)
- Hold the walls (towers + battlements + wall-walk)
- Fall back if needed (keep as final refuge)
Final Summary
A medieval castle was not defended by one single feature, but by a layered system of walls, towers, moats, gatehouses, and traps designed to delay, weaken, and destroy attackers. The strongest castles combined smart engineering with strong garrisons, good supplies, and excellent positioning—making them some of the most effective defensive structures in medieval warfare.